> For the complete documentation index, see [llms.txt](https://help.hireforce.io/llms.txt). Markdown versions of documentation pages are available by appending `.md` to page URLs; this page is available as [Markdown](https://help.hireforce.io/getting-started/settings/templates/email-templates.md).
# Email Templates
Email templates help your team work efficiently
## Overview
In **Hireforce**, there are three categories of default email templates: **General, Auto Confirmation, Event**
{% tabs %}
{% tab title="General" %}
General email templates are for general purposes. It includes:
* **Disqualify Candidate**: This is the email will be sent when you reject a candidate with an email.
* **Greeting Candidate**: The email template is used to approach candidates. If the candidate is a match for the job the recruiter is hiring for, you can send this email to introduce the job opportunity to the candidate.
* **Quick Update**: The email template is used to notify to candidates that you are still in the process of reviewing their applications, and considering the next step
{% endtab %}
{% tab title="Auto Confirmation" %}
Auto-confirmation email templates are emails that are set automatically. These emails can be sent automatically to candidates after they apply.
Auto-confirmation email templates can be set as the default
{% endtab %}
{% tab title="Event" %}
Event email templates are used when scheduling events, such as interviews with candidates. This email template has a specific field containing the event information.
{% endtab %}
{% endtabs %}
## Email Templates Management
You're able to edit or delete the Location after being added:
* Edit: Click the **Pencil** icon on the right > Edit information then click the **Update** button.
* Delete: Click the **Trash** icon on the right > Click the **Delete** button.
## Create A New Template
1. Go to the Settings -> Email Template
2. Click **+ New Template**
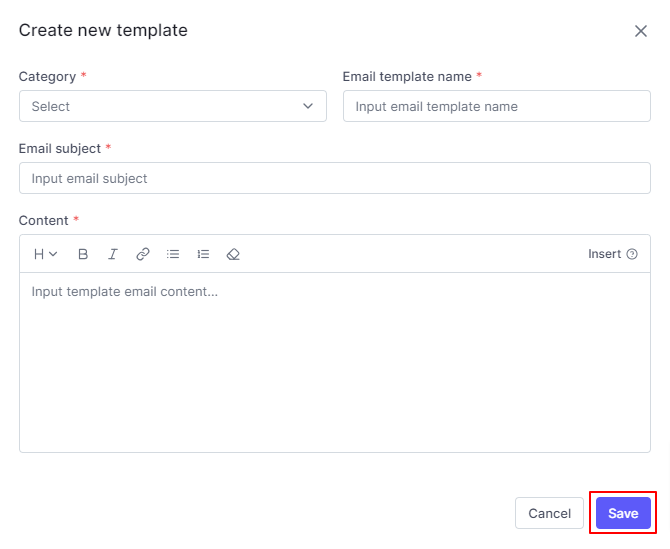
3. Input all information (required field) about the new email template
* **Category**: Select a type General, Auto Confirmation, or Event
* **Email template name**: The email template's name is clear, concise, and distinct from other names.
* **Email subject**: The subject of the email sent to candidates. You can use personalization like {job\_title}
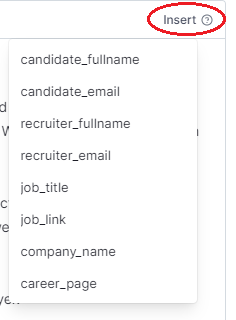
* **Content**: The body of the email sent to candidates. Using the button to format text: heading, **bold**, *italic*, hyperlinks, bulleted lists, numbered lists, and clear format. You can use personalization by click **insert**
4. Then click the **Save** button